Overall I am fairly pleased with my final trailer despite the decreased quality due to render time. My favourite parts of the trailer are that shadows throughout the scene. In my trailer there wasn't that many animation techniques One of the main problems with my trailer is the quality of the character model which is very basic. Because of this all the shots of bond are either long or medium shots. Another main problem is all the features which could have been in this trailer but was removed due to time restraints and render times.
During the project, there was not that many technical issues. One issue which did happen was a problem with the biped character in one scene. The biped had been corrupted and the file was unreadable. After a little research, I discovered that this is a random fault which can occasionally happen. The only to fix this is to import all the other objects except the biped character into a new scene. All the cameras, lights and Parahawks stayed the same and had the correct animation, however the biped model had to be reanimated. This was a small inconvenience but the animation on the model, wasn't to much so it didn't take much time to redo.
Thursday, April 14, 2011
SWOT Analysis
Strengths
- One of my main strengths was that I was good at modeling vehicles. This is mostly because blue prints can easily be found online of a lot of vehicles. These Blue prints can be used as reference plates when modeling.
- Another strength I found was that I am good at creating simple materials. This can be said for the snow and gold in the animation scenes and also the chrome and fabric used in the Parahawks.
- Although I only used one light in all my scenes, I am confident I understand how the lights in 3ds Max work.
- I wasn't good at modeling a Character, however when it came to animating the biped model, I found no problems when learning how to do it.
- One of my main problems was that I wasn't good at keeping up to date with my blog. This was mostly because all the scenes were being worked on simultaneously and were all finished at the same time.
- My main weakness found during this project was that I am not that good at modeling people. I can model the basic shape of a person like legs, arms, torso and head, however I can't model faces or add details to the clothes.
- Another weakness was my limited knowledge of 3ds Max. This meant that despite all the tools available on the program, I didn't know what all of them did or how to use them.
- The main opportunity in this course was to learn how to use 3ds Max. After this project I can now animate a small number of objects to make a short movie. Although I haven't learnt all the many utilities in 3ds, I am confident I can use the basic elements like modeling and simple animation.
- The main threat in the project was the render time of the scenes. All my scenes are simple with as few objects in them as possible. Also the quality of trees and some materials has been turned down to reduce render time. An example of this is the chrome colour of the Parahawks, which should be reflective. Also due to render time, each scene is only several seconds long for each camera shot. These few seconds, even with the reduced quality still took about a hour to render. The render time definitely effected the quality of my work.
Recommendations
If given more time on the project I would add a few more things in my trailer. These are:
- Explosions were meant to be in one of the scenes, but due to time, couldn't be added in the final version of the trailer. This could be done by loading a picture of an explosion onto a plane and adding it to the scene. Lights could also be used to make a small flash of light for several frames.
- Snow Spray could be added to the back of the Parahawks after they have landed. This would be done using one of the particle systems available on 3ds Max. The snow spray wasn't added in the final version due to time restraints and my limited knowledge of how to use particle systems. This however could have been solved by searching the Internet of using one of the 3ds tutorials.
- The character model would also be redone completely adding more details to the face and clothes. With these added features, there could have been more close-ups of Bond, because at the moment due to the quality of the current model no close-ups are shown of Bond.
- Sound Effects were also meant to be added to the final trailer. However good free sound effects couldn't be found. These sound effects would have mostly been the sound of the Parahawks (snow mobile engine and sound of rotor blade) and skiing noise.
Wednesday, April 13, 2011
Scene 6 - Title
The final scene in the trailer is a close up of the title "The World is not Enough", coloured in gold while the camera zooms out. The first part of the scene was to model the letters using a reference plane and boxes.

The gold was created using a Multi-layed material which was also very reflective. This was done because a plane was also added to the scene above the text. On the plane was a material of a fireball which would be reflected into the text during the animation.


The Camera was animated using set keys to zoom out until all the text is displayed on the screen. The fire plane was then animated moving across the stage after the camera has zoomed out. This means that the fire would move up the text giving it the effect that the fire is moving and not just a picture. An Omni light was added to the scene in between the title and the plane. It was then animated to pass over the title to give the effect of the gold shinning.

The gold was created using a Multi-layed material which was also very reflective. This was done because a plane was also added to the scene above the text. On the plane was a material of a fireball which would be reflected into the text during the animation.


Scene 5 - Skid
The final scene involving the Parahawks and Bond is taken from the movie as well. Bond and the Parahawks Slide down a hill then drift round a tree just in front of the camera. Just like in Scene three, a box was used to create the stage with a plane behind the stage to be used as a background. The background picture was the same picture used in scene three. Pine Trees were also used and arranged in the same place in the movie.

The Parahawks were added and animated just like in scene four. The key frames were edited to modify the speed of the Parahawks at specific points. This meant that they would speed up while going down the hill and slowing down when drifting round the tree.

Bond was then added to the scene and animated the same way as the other scenes. The main difference in this scene is that when bond goes round the tree, he leans completely over which makes the animation look a lot more realistic.

Scene 4 - Overshot
The fourth scene will also sticks to the original movie shot. This scene is a long shot of Bond and two Parahawks chasing him now on the ground with all three of them weaving around small trees. The camera is an overshot of the action which slowly tracks the action from a Birdseye view.First the stage was set with a box edited with the soft selection tool and assigned the snow as its material. Unlike the other stages, this stage was given more texture by adding more bumps. This meant that the Parahawks and Bond would have to be rotated over the bumps. Large pine trees were then added on both sides of the stage to hide the edges away from the camera which would be added later. Three small trees were added to the middle of the stage and arranged in the same way as the small trees in the actual movie.


The two Parahawks were then added to the scene. Unlike the other scenes before this all the Parahawks were in the air and had parachutes. Now that they have landed, the parachute was removed and the blade no longer needs to rotate. The Parahawks were then animated using the set keys, and were moved around the trees. Their rotation was also animated to travel over the bumps on the ground. One of the Parahawks also makes a small drift missing a tree and the other Parahawk. To make the animation more realistic the speed of the Parahawks was altered so that the drifting Parahawk slowed down into the drift.

Once the Parahawks were animated Bond was added to the scene. The position of Bond was animated once again with auto keys going around the trees. It was also important to animate him moving at the same speed of the Parahawks. The legs were then rotated and positioned around the bumps on the stage. When Bond is going round the tree the legs were bent differently to show him leaning into the turn and therefore look more realistic. Just like in the other scenes, Bond also occasionally uses his ski sticks.

The camera was then placed above the stage looking down on the Parahawks and Bond making sure both were in the shot. The camera was then moved using set keys to follow the action. To add a small camera shake, the camera target was animated randomly left and right. To finish the scene the sun light was added as well as the shadows. Once again to reduce the render time, the trees had the branches and trucks removed and quality of the trees decreased to medium.
Scene 3 - Landing
The Third scene in the trailer is a scene where one of the Parahawks land. Staying true to the film, the landing will be showed in two shots. The first shot will be a long shot of bond escaping while the Parahawks give chase and descend. The second shot will be a close up of the Parahawk as it lands to continue the pursuit on the ground.
Just like in the second scene the stage was created and assigned the snow material. Unlike the second scene a rock wasn't need on the stage however trees were added. These trees were created with the 3d studio max library, which has many different types of foliage. The type of tree used in this scene was a Scottish pine. A plane was then added to be used as a background. The plane was sized to 10 times the scale of the picture found.

The biped character was then added to the scene and its potions on the stage were added using auto key. Unlike the previous scene, the character will have no need to move his legs so therefore only the arms were animated. The way the character was set in auto key meant that he sped up half way through the animation. The arms were then animated to simulate the the skiing motion. This meant that in the animation, Bond was going at a steady speed, then uses his sticks to make him speed up. This made the animation look a lot more realistic.

The Three Parahawks were then added to the scene and just like the other scene the, propeller blades rotate and motion blur was added. The three Parahawks were then made to descend slowly after bond using the set key. One of the Parahawks then was changed to descend faster and land before continuing on the ground. The propeller blade for the landing Parahawk was then set to slow down during the descent. After the Parahawk had landed, the parachute was animated with set key so it would fall to the ground just after landing.

After all the objects had been created in the scene the cameras for the two shots were added. The first camera was a stationary long shot of the stage. The second camera was a close up of the landing Parahawk which was linked to the body. Therefore as the Body descended, the camera was constantly following it.

The final part of the scene added was the lighting and shadows. To keep consistent with the rest of the trailer, it is important that the sun is roughly the same place in all scenes. This mean that the shadows are all the same size and are in the same direction. Because of the shadows, the render time of this scene increased dramatically. This was mostly because of the trees and their shadows. To decrease the render time, the quality of the trees was turned down to medium. Also branches were removed from the trees which couldn't be seen by the camera. Two versions of the scene were then saved. The only difference between these versions was the angle and position of the background plane, which couldn't be seen by the second camera in its original position.
Tuesday, April 12, 2011
Scene 2 - Ski Fall
The second part of the trailer would be a scene in which James Bond will jump of a small ledge and then start to get away from the Parahawks. We then see the Parahawks shadows on the hill and then see the Parahawks give chase. The important part of this scene is the shadows that are seen first before the Parahawk. This would also be the first scene in which the biped model is animated.
First the stage was created using a box and slowly modifying using the soft selection tool. The Snow material was then added to the stage. A rock was also made by using a sphere and the soft selection tool. The biped James Bond was then imported to the scene and placed on the ledge. Using the auto set animation the biped character was moved and rotated into the correct positions to simulate him jumping off the ledge and skiing away. After the position and angle of the biped were correct, the legs and arms were then animated using the set keys. The arms were also animated into a skiing motion after he had landed. The skis were linked to the biped feet and the sticks were linked to the biped hands so they would move with the arms and legs.

The three Parahawks were then added to the scene. Just like in scene One, the blades were made to rotate and motion blur was added. However instead of using the path constraints the Parahawks were just made to descend using the set keys.

After all the animation was complete, an Omni light was added to the scene to make the shadows appeared on the mountain behind Bond escaping. The last effect added was the movement of the camera which would look up when the shadows appeared, then follow the Parahawks flying across the stage.

Adding Biped
A biped skeleton was added to the James bond model to allow the character to be animated. The skeleton parts ware re sized and moved to fit the body. Also the envelope was edited to increase the area of the body which was affected by the different parts of the skeleton.

After the biped skeleton was fit, the model was moved into a skiing position. This means that it could be loaded into the scene and moved only slightly each time to simulate skiing. This would include bending and rotating of the feet, and pushing and pulling with the ski sticks.


After the biped skeleton was fit, the model was moved into a skiing position. This means that it could be loaded into the scene and moved only slightly each time to simulate skiing. This would include bending and rotating of the feet, and pushing and pulling with the ski sticks.

Snow Material
Because the majority of the scenes would involve snow, it was important to make a realistic snow material which could be used in all the stages. To begin the material the colour white was chosen for the specular colour and light grey for the diffuse colour. To give the material shade, smoke was used as the diffuse colour. This made the material mostly white with light shade of grey in random spots. To give the snow texture, smoke was also used as a bump effect.

Scene 1 - Flyby
The first scene in the trailer is a wide shot of the mountains with the three Parahawks heading towards the camera. Using a picture of some snowy mountains found on the Internet and was assigned to a material. A plane was used for the background which was 10 times larger then the size of the picture. The material was then assigned to the plane.

Three parahawks were then loaded into the scene with all the parts linked to the body of each Parahawk. The propellers were then rotated using the curve editor and motion blur was added to blades.

Once the blades were finished three lines were then created to be used as paths. Two of the paths go in the same direction while the other goes off to the right of the stage. The bodies of the parahawks were then given path constraints of the lines. Because the parts of the Parahawk are all linked to the body, they will all follow the line as well. Bank was also added to the path constraint to make the motion more realistic. To finish the scene the camera was then added facing the plane at a perpendicular angle.

Thursday, March 3, 2011
James Bond Model
The final Model was James Bond who is on skies. Because the trailer would mostly be about the Parahawks chasing Bond, we will only ever see long or medium shots of bond. This means that not much detail must go into the James Bond model. A box with segments three by three was created in the front plane. The top Corners were then pulled out to create the shoulders and the arms were created using the extrude tool on the shoulders. The bottom corners of the box were pulled up so that the legs could be made the same way as the arms. The knees in the legs were then pulled out and the elbows were pushed in.

Feet where then added using extrude technique. Because Bond will only be holding Ski sticks throughout the trailer, it was not necessary to create the fingers. Instead bevel was used to create a closed fist.

Mesh smooth was then used to smooth the model of bond over. A ski was made using a thin box which was curved at the front to resemble skis. This was copied and added to the other foot. To create the ski sticks, a 2D slice of the stick drawn in one of the views. Lathe was then used to create a 3D object to create the ski stick. This was also copied and put in the other hand.


Parachute Model
The parachute was made using a box with only one segment for the height. The parachute would be created using the soft selection tool to slowly form the shape of a parachute. The parachute is thin and therefore the height segments would be only one.

I added bumps in the box so that once mesh smooth was used; the bumps would look like the curves in the parachute. The centre bumps were then lifted higher while the outer bumps were smaller. The edges of the box were then pulled down around the whole box.

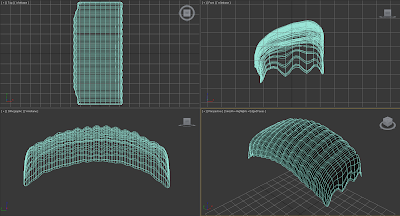


Mesh Smooth was then used to smooth the box over. After that soft selection was used to slowly manipulate the box to look like a parachute. The front of the parachute was pulled higher while the back was lowered. The corners of the parachute as well as two points on both sides were pulled down for the strings which would later be attached to the Parahawk.


Parahawk Model
First the Parahawk blueprints were loaded into a vertical and horizontal plane. The planes would be used to make a more accurate shape. Next I created the propeller frame using circles and lines. The loft tool was then used make the frame into 3D bars. A box was then used to create the main body of the Parahawk and slowly manipulated to get the basic shape using the planes as guide lines.


Once the basic shape of the body was completed, one of the skies was made using a cylinder and another box. This ski was then copied to create 4 separate skies. Another loft was used to create a bar which joined the back skies together. Boolean was used to merge the back skies and the bar together. The centre of the propeller was made with the lathe tool and a box was used to create the blade. The blade was then copied 2 times and then each copy was rotated to fit evenly on the centre of the propeller.


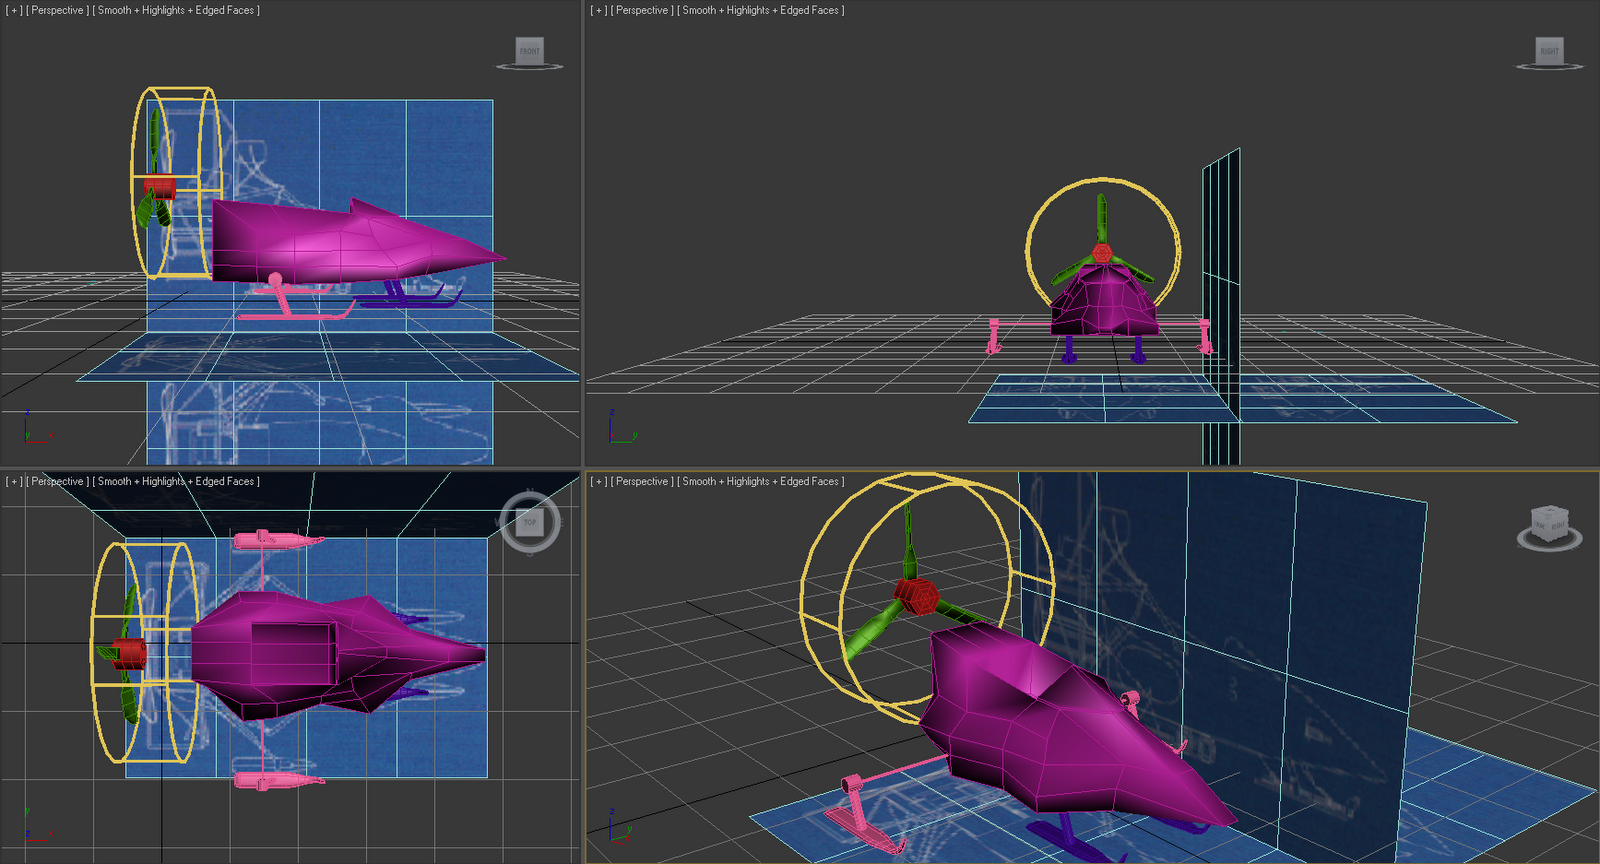
After the propeller was finished, it was moved to the correct position in the frame. The body was also mesh smooth and adjustments were made to its final shape. Improvements were added to the Parahawk including more details like the parachute bag and the bars where the parachute strings would be attached. Also the screen was replaced so it could be made transparent.


Moodboards
I decided to make a trailer for 'The World is not enough' because out of latest James Bond movies, it was my favourite. Also the film had the most interesting vehicles which could be used in the trailer. These were the Q boat in the Thames chase scene and the Parahawk in the Ski chase scene. I then created 3 moodboards of the action scenes identified in the Research Board. The Moodboards shows shots from the action which would be used to create the storyboard. As well as the images from the film, blue prints for the vehicles were also researched to be used as planes in 3D studio Max.

Bond chases a suspect escaping on a boat via the Thames. The suspect then tries to escape by a hot air balloon but is stopped by bond. She then commits suicide by blowing up the balloon.

Bond is attacked by a hit squad who are using armed paraglide / snowmobile hybrids called Parahawks.

Bond is ambushed by a helicopter equipped with a Saw used to cut down trees. He uses his car to destroy the helicopter, but is then attacked from behind by a second helicopter. The Car is sliced in half by the saw.
The scene I have chosen for the trailer is the Ski Chase because Blue prints of the Parahawk were printed in a James bond magazine. This would make the Parahawk easier to model. No blue prints for the Q boat could be found.
Research Board
I decided that the trailer will most likely be a preview of one action scene. Because the films are about James Bond, I also decided that the action scene should have Bond in it. The research board is the 5 latest James Bond films and all the possible scenes which might be used in the trailer. I also decided that hand to hand fights or shoot outs would be harder to animate, so therefore only the chase and fight scenes involving vehicles were added to the Research Board.


Tuesday, February 15, 2011
Tutorial 3 - Materials
To create your own material you can make a file in paint or paint shop pro with the dimensions of 3cm by 3 cm and save it as a bitmap.
To load a material click material editor and select an open slot. Then click on the small empty box next to the diffuse slot. Then select bitmap and load the image you want to use for the material.
To load a material click material editor and select an open slot. Then click on the small empty box next to the diffuse slot. Then select bitmap and load the image you want to use for the material.
Tutorial 2 - More Modelling Techniques
Lathing is a modelling technique when you can rotate an object 360 degrees around any direction of the objects pivot point. This can be used to create round objects like bowls and glasses. To use the Lathe, highlight the object you wish to change, you must first move the pivot point. This is done by using the object hierarchy. Once the pivot has been moved select modify, and then select lathe modifier.


Loft is a technique in which you can take a shape and make it follow another shapes path to make it 3D. An example of this would be drawing the shape of a hanger, then making it follow the outline of a hanger. This will therefore make a 2D object into 3D. To loft objects, two shapes must be created. A primary shape(hanger) and a secondary shape (Small circle). Highlight the primary shape and go Create, compound objects and then select loft. Then select "Get shape" in the loft properties box and select the secondary shape.
Boolean is a technique in which you can either merge to objects together into one object, or minus one object from another. The more objects you have on a stage, the longer it will take to render, therefore merging two objects together will reduce the render time.

Arrays are used to create duplicates of objects, and place them in different positions in the x, y and z coordinates. An example situation when an array could be used to to make a set of stairs out of boxes. Each box is raised and sent back a little behind the previous box. To make a Array select a shape and then go to Tools, and Array. This will open a pop up box where you can specify how many copies you want to make and each copies new position. Although making array will be useful in a few circumstances, I do not see any use for arrays in my trailer.

Thursday, February 3, 2011
Tutorial 1 - Introduction to low poly modelling and Spline modelling
In 3D Studio Max there are many simple shapes which can be created. This includes cubes, cones, cylinders etc. The following image is of a simple castle created by using those simple shape tools.


The more shapes you use the more memory will be taken up and the long it will take to render. It is important to keep the shape count to a minimum. A way in which we keep the shapes to a minimum would be to create a polly and keep adding and taking away to form a complex single shape. An example of this would be for the caste which was created first. Instead of using many shapes for the walls and ceiling, just one box can be manipulated into the shape of a castle. To access the menu to edit a polly you must select modify and then choose from a drop down list "edit polly".

The apples were made by using spheres which were then mishapped to give a more organic feel to them, because apples are not perfect spheres. A cone was then added as a stork. The bowl was also a sphere which was pulled into itself to make a bowl shape.
Subscribe to:
Posts (Atom)